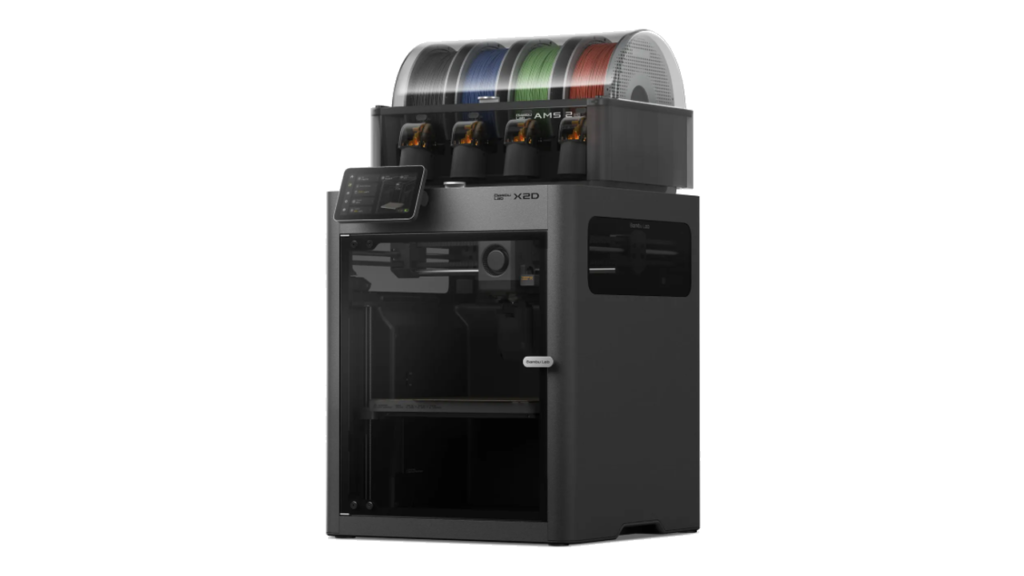
The newly released “X2D Combo” from Bambu Lab inherits the standard size of the company’s first-generation flagship “X1-Carbon” and the “P2S” launched in 2025, yet it’s loaded with features from the high-end “H2D” — namely dual nozzles and an active heat chamber. It truly is a “best of both worlds” machine.
In this article, I’ll cover everything I’ve learned after putting over 200 hours on a unit provided by Bambu Lab’s Japanese distributor Sunstella — performance, real-world capabilities, and important cautions you should know before buying.
While highlighting the differences from the closely related “P2S” and “H2D,” let’s dive deep into exactly what kind of 3D printer the “X2D” really is, backed by plenty of test print examples!
Unboxing the X2D Combo
The box is roughly the same size as the “P2S,” and the packaging looks nearly identical.
Remove the AMS 2 Pro from inside the unit, then take off all the cushioning, fixture brackets, and zip ties.
The first notable item is the external exhaust fan included inside the AMS 2 Pro — a component that didn’t exist with the “P2S.” It serves to vent chamber air and provide filtration.
Inside the accessory box you’ll find:
- Display
- Auxiliary nozzle extruder
- Spool holder
And one of this review’s key items: the auxiliary extruder.
This gets mounted on the back of the X2D. The installation steps are:
- Plug in the signal cable
- Attach the cover, then hook it onto the body
- Insert the filament tube coming from the unit
- Tighten with the included wrench
Almost done with setup after that. Then:
- Insert filament tubes into both the auxiliary extruder inlet and the main nozzle inlet
- Set up the external spool holder for auxiliary nozzle supply
- Mount the external exhaust fan under the buffer and connect it via the 6-pin power cable
And that’s it — setup complete.
Powering On and Initial Setup
Plug in the power cable and switch on the rear power button.
The touchscreen boots up and initial setup begins. Complete the following:
- Region and language settings
- Wi-Fi connection
- Bambu account login
- Terms of service acceptance
Then the first self-test and calibration processes run automatically:
- Motor noise cancellation (reduces motor whine during prints)
- Vibration compensation (for high-speed printing)
- Auto bed leveling (corrects subtle heat bed tilt)
- Nozzle offset calibration (precisely aligns main and auxiliary nozzles)
It’s a lengthy ~35-minute process but fully automated — no user intervention needed, so just leave it alone.
Afterwards, run the firmware update as well.
Basic Specs and Key Features
The X2D is a 3D printer that maintains the same size as the established mainstream models while generously packing in high-end features.
Standard Size, Dual-Nozzle Mechanism
The X2D has a build volume of roughly 256mm per side — the most standard size for personal use. It’s the same size as the popular “X1” and “P1 series,” making it easy to fit into limited home spaces.
The X2D runs two nozzles. The left one is the main nozzle — a direct-drive extruder sits inside the toolhead. The right one is the auxiliary nozzle, Bowden-style, with its extruder mounted on the back. Different drive systems on each side is unusual, but it pays off.
- Lighter head, faster prints. Because the right nozzle’s extruder isn’t in the head, the toolhead stays light — enough to hit a max travel speed of 1000 mm/s. That’s the headline speed win.
- Easy nozzle swaps. Unplug the front fan cable, remove the front fan, lift off the silicone cover, release the buckle — the nozzle comes out. Both nozzles are identical, so you can swap them left to right.
- Hardened steel. The nozzles are hardened steel, so they’re durable and ready for carbon-filled filaments straight out of the box.
- Right nozzle = support or second material. Set it up with support filament or a different material than the main nozzle.
Almost no purge waste. Two-color prints on the X2D dump almost no purge. Compare that to the single-nozzle P2S, which throws off a large amount of purge during multicolor jobs. Less waste also means shorter print times.
Nozzle switching uses a “Gear-and-Trigger” mechanism: the nozzle lifts while a resin-leak-prevention guide snaps over at high speed. It’s pure physical contact — no dedicated switching motor. That keeps both cost and weight down, and it’s exactly the kind of clever engineering that makes the X2D feel like a step forward.
Exhaust Fan Cooling & Active Heat Chamber
The X2D is equipped with powerful features that control both cooling (to prevent chamber temperature rise) and heating (to actively warm the chamber).
A new external exhaust fan — not found on the P2S — efficiently expels hot air from the chamber. It automatically prevents the interior from getting too warm even when printing PLA, so you can print with the door closed while keeping things relatively quiet and stable.
In my testing, even at ~25°C room temperature, the chamber temperature stayed below 40°C throughout — excellent cooling performance.
Furthermore, it includes an active heat chamber that can maintain up to 65°C. This dramatically improves print success rates with warp-prone materials like ABS and ASA, enabling higher-quality prints.
Main Nozzle vs Auxiliary Nozzle Print Comparison
When buying a dual-nozzle machine, a common worry is: “I’d hate it if there’s a quality gap between the main and auxiliary nozzles.” So let’s verify with actual test prints.
3D Benchy & FDM Test Print Quality
First, I printed the classic 3D Benchy with red PLA on the main nozzle. At a staggering 1,000 mm/s speed, it produced a nearly flawless result with barely visible layer lines.
Next, the FDM test print:
- Main nozzle: Ringing well suppressed, finished in ~1 hour 40 minutes
- Auxiliary nozzle (recommended max 200 mm/s): ~2 hours 50 minutes
The auxiliary nozzle took longer, and there were some slight rough spots on overhang top surfaces, but the overall quality was on par with the main nozzle — still a high level.
As long as you don’t mess up the filament type or slicer settings, the auxiliary nozzle won’t produce disastrous results. You can use it with confidence.
Dual Nozzle Switching Speed
The X2D’s dual nozzle uses a passive Bowden mechanism — the head’s bar hooks onto a tab at the rear of the heat bed to change nozzles. Compared to the motor-driven active switching of the “H2D,” it’s dramatically faster, completing the switch in roughly 15 seconds.
This passive mechanism, which eliminates motors, is a key design choice for keeping the print head as light as possible for high-speed printing.
Printable Area Verification
There’s actually a clear difference in build area between the main and auxiliary nozzles — something you must pay attention to before printing.
- Main nozzle: Covers the full 256mm square area
- Auxiliary nozzle: Cannot reach roughly the leftmost 20mm — this area is a no-print zone
When setting support material or alternate colors on the auxiliary nozzle, be careful with model placement.
Multi-Color & Multi-Material Printing with Dual Nozzles
The dual nozzle’s greatest strength is easy printing with different colors and different materials combined. Let’s examine the X2D’s capabilities through concrete examples.
Two-Color PLA Print
I assigned white and black PLA to the left and right nozzles and printed a 5cm-tall panda model. Thanks to the dual nozzle’s fast filament switching, it finished in about 3.5 hours with zero Poop (waste).
For comparison, the same print on a single-nozzle with AMS:
- Print time: ~8 hours
- Poop generated: 135g
X2D: ~3.5 hours / Zero Poop
Single Nozzle + AMS: ~8 hours / 135g Poop
Can you tell which color (black or white) was printed by the auxiliary nozzle? The answer: black was the auxiliary nozzle. Looking at just the finished product, it’s impossible to guess which nozzle printed which color. That level of quality.
Color Mixing — Simulated Three Colors
Using white and black PLA with Bambu Studio’s color mixing feature, I set a 1:1 grey as a pseudo third color and printed a raccoon model.
The grey reproduced beautifully — and since it’s not actual grey filament, there was zero Poop. Because color mixing uses thinner layer heights, it took about 8.5 hours, but the ability to simulate 3+ colors with zero waste is a X2D-exclusive advantage.
By the way, if you accept Poop generation, you can print more colorful models using just 4 colors (Black, Cyan, Yellow, Magenta). For example, a 7-color cat model — where purple, green, and orange are just combinations of Cyan+Magenta, Cyan+Yellow, and Yellow+Magenta respectively.
With 3+ colors, Poop does occur, but even so, dual nozzles make color mixing far easier than single-nozzle systems.
PETG + PLA Support Interface
The dual nozzle shines when combining materials that don’t stick well to each other.
I printed an arm model in Polymaker PETG, using PLA only for the support interface layer. The result: a glass-smooth surface where the supports touched, as if supports had never been there.
Compare with the PETG-only version — the surface finish difference is staggering. Even support removal was effortless: in some spots, supports just fell off when removing the plate. Even in tighter areas, no tools needed — just a little finger pressure.
“I have to use supports, but I refuse to compromise on surface finish.” The X2D handles exactly those kinds of serious prints.
TPU + PLA Support
Using the TPU feed assist module, I printed a flexible TPU shoe model with PLA supports.
After ~1.5 days of printing:
- Supports came off cleanly with a snap
- Anyone who’s printed TPU knows: if you use TPU-on-TPU supports, this level of easy removal is basically impossible
- Even with significant force, the TPU body never tore or deformed — clean separation
- Surface finish after full support removal was excellent
For models that require flexibility (shoes, basketballs, etc.), TPU and similar elastic filaments are ideal. The X2D makes this PLA-support-on-TPU technique accessible at a more affordable price and smaller footprint.
0.8mm Nozzle — Maximum Size Print
Using a 0.8mm nozzle (twice the standard diameter):
- Left main nozzle: Silk PLA
- Right auxiliary nozzle: PLA
- Scaled to the maximum 256mm height
- Layer height: 0.4mm (doubled)
The two-color horse printed in under 12 hours at maximum size. Aside from a support settings mistake on the left hind leg, the result was excellent. Even with the aggressive 0.8mm layers, the white PLA from the auxiliary nozzle showed no significant issues.
Note: As of May 2026, different nozzle diameters cannot be used simultaneously in dual-nozzle mode — that applies to the H2D and H2C as well.
Water-Soluble PVA Support — Complex Geometry
For models with deep recesses and complex intertwined shapes, using water-soluble PVA filament on the auxiliary nozzle is highly effective.
I printed a complex AI-generated model — the Bowden auxiliary nozzle handled it without issues. After soaking in water for a full day, the surface was so clean you couldn’t tell which side had supports.
Next: a rocket model generated by AI tool “Tripo.” Main nozzle handled 4 colors, auxiliary nozzle used PVA support. After roughly 36 hours of printing, simply soaking in water cleanly removed support structures that would be impossible with breakaway supports.
Key advantage: Expensive PVA filament gets fully utilized without being wasted as mountains of Poop — a major benefit of dual nozzles.
Active Heat Chamber — High-Temp Material Tests
The active heat chamber on the X2D demonstrates immense power when printing warp-prone, heat-sensitive filaments.
ABS Test
Using ABS — the poster child for warping — I tested the active heat chamber. From a 24°C room temperature, heating reached the default 60°C in about 10 minutes and held steady throughout the print.
Result: No edge lift, no corner warping — a perfectly clean print.
Compare with the P2S (max chamber temp ~50°C): the P2S print had major warping on the left side and visible overall distortion. The difference with the independently heated X2D is unmistakable.
ASA Test
ASA shares ABS’s warping tendencies. Using Polymaker ASA, I printed a large, intentionally warp-prone model filling the entire bed.
- X2D result: No major lift, but one corner slightly raised. Complex geometry and slicer settings can still cause minor warping even with the heat chamber.
- P2S comparison: Dramatically worse — the difference in warp suppression is night and day.
After full cooling, the quality difference between heated and non-heated chambers was crystal clear.
Polycarbonate (PolyMax PC)
The active heat chamber also proves invaluable for warp-prone polycarbonate filaments. I printed PolyMax PC without fear of warping — the kind of material you’d hesitate to even attempt without chamber heating.
For home users, specialty filaments may be rare, but this clearly demonstrates the X2D’s high potential. The combination of dual nozzles and heat chamber puts advanced-material printing within reach.
Three Things to Know Before Buying the X2D Combo
The X2D is highly capable, but it’s not a flawless do-it-all machine. Here’s what I learned after 200+ hours:
1. The Poop Problem with 3+ Color Multi-Color Prints
The X2D’s strength is zero-Poop printing with two colors or materials. With 3+ colors, filament switching generates Poop just like single-nozzle machines.
In the 4-color (color-mixed, 7-color output) cat model:
- Cat body weight: 71g
- Poop generated: 422g — roughly 6x the model weight
- Including the prime tower: 536g — roughly 7.5x the model weight
If you plan on frequent 3+ color multi-color prints, be warned. It’s an enormous waste of material.
2. Maximum Nozzle Temperature: 300°C
A key difference from the high-end H2D: the X2D’s nozzle caps at 300°C, while the H2D reaches 350°C and can handle ultra-high-temp super engineering plastics like PPS-CF.
The X2D’s upper limit in practice is polyamide, polycarbonate, and around PPA-grade materials. For home use this is plenty, but if you want to frequently use more specialized industrial filaments, take note.
Before buying, check the recommended temperatures for the filaments you plan to use.
3. Rear Design and Filament Tube Clearance
The X2D has a distinctive rear profile with the auxiliary extruder up top and the external exhaust fan below — meaning you’ll need extra clearance in the back for maintenance access.
More importantly, the filament tube clearance above the tool head is tight:
- H2 series: ~8cm clearance
- X2D: ~4cm — roughly half
The tight space causes the tube to bend at sharp angles, leading to frequent feed errors when loading stiff filaments like carbon-fiber composites.
Workaround: You’ll need a spacer/lifter part to slightly raise the glass lid and create more room.
Value & Comparison
| Model | Price (standalone) | Price (combo with AMS 2 Pro) | Positioning |
|---|---|---|---|
| P2S | $549 | $799 | Single-nozzle, PLA/PETG |
| X2D | $649 | $899 | Dual-nozzle, active chamber |
| H2D | $1,899 | $2,199+ | Business-grade, laser, larger build |
The X2D costs just $100 more than the P2S standalone — and for that you get dual nozzles, a 65°C active heat chamber, and dual-camera AI monitoring. It’s the easiest upgrade decision in Bambu’s lineup. The P2S is still perfectly fine if you only print PLA/PETG. The H2D moves into prosumer/business territory — 325×325 mm build, optional laser, and the full Vortek multi-material system.
The X2D is the best-value dual-nozzle printer Bambu has shipped. Two-color and two-material prints with almost no waste, a real active heat chamber, dual-side cooling, and dual cameras. If you print ABS/nylon or want clean supports without the purge tax, it’s an easy recommendation.
Conclusion: Who Should Buy the X2D Combo?
After 200+ hours of hands-on use, the X2D is especially recommended for:
✅ People who want to use dedicated support materials
✅ Those who frequently print ABS, ASA, and high-temp filaments and want a cost-effective standard-size printer
The X2D packs dual nozzles and an active heat chamber into a standard-size machine for just about 20,000 yen more than the previous generation — remarkable value for money.
On the other hand:
❌ People who frequently want 3+ color multi-color prints — unfortunately, not recommended. The massive Poop waste means you should look at other models.
Bottom line: Multi-color is just the cherry on top. If your main use case is support material applications and heater-required filament printing, you’re the X2D’s ideal match — the person who will squeeze every drop of value out of this machine.
If your needs align with multi-material combinations and heat-resistant filament printing, the X2D will be your best companion.